|
<< Click to Display Table of Contents >> Importing Excel Boring/Well Locations |
  
|
|
<< Click to Display Table of Contents >> Importing Excel Boring/Well Locations |
|
Boring and well locations can be imported into an existing project from an Excel spreadsheet by going to File > Import > Excel Data > Boring/Well Locations. The Import Excel Project Data form will be displayed. This form is used to specify the Excel file to be imported and the cell correspondence between the Excel spreadsheet and the data for the boring and well locations.
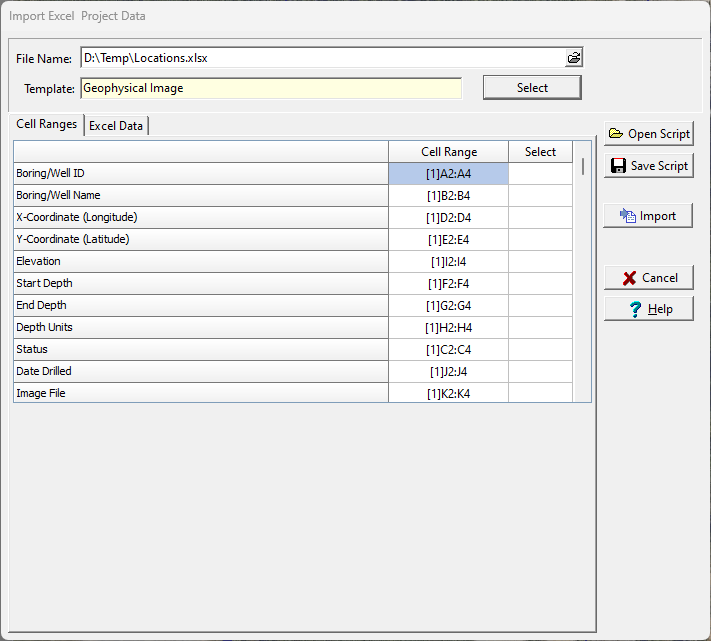
The Excel spreadsheet to be imported should be specified first in the File Name on the form. It can be selected using the button to the right. If a script is being used to specify the cell range data, it should be selected next by clicking on the Open Script button.
A template for the borings and wells can be specified using the Select button on the right of the Template name. If no template is specified then only the location and optionally a geophysical log TIFF image will be imported. When the boring/well with no template is opened only the TIFF image will be displayed. If the template is specified and the image file is also specified the TIFF geophysical log image will be displayed in the log in the "Geophysical Log Image" column.
If the Image File name is specified, the image files will be copied to the datastore and used for display purposes.
The Cell Ranges tab is used to specify the correspondence between cells in the Excel spreadsheet and the data in the boring/well log. One or more of these data types can be imported by specifying the cell range in the Cells column. If no cell range is specified for the data type, that data will not be imported. The boring/well names, x and y coordinates must be specified. The x and y coordinates can be specified as decimal degrees or in degrees, minutes, seconds separated by spaces (e.g. 39 58 24.37 N and 83 8 1.8 W).
The cell range can be specified by typing it in or by clicking on the Select column to the right of the cell range. A Select button will be displayed in the column, click on this button to display the spreadsheet in the Excel Data tab.

To select the cell range, click on the first cell and then hold the left mouse button down while selecting the cells. When the cell range has been selected, click the right mouse button or the OK button on the toolbar above to return to the Cell Ranges tab. The selected cell range will be filled in on the form. This operation can be repeated until all of the cell ranges for the data types have been specified.
The template and cell correspondence specified on this form can be saved to a script using the Save Script button. This script then can be opened using the Open Script button and used to import boring/well data from other Excel files that have the same formatting.
To import the data, click on the Import button.