|
<< Click to Display Table of Contents >> Points |
  
|
|
<< Click to Display Table of Contents >> Points |
|
![]()
Adding
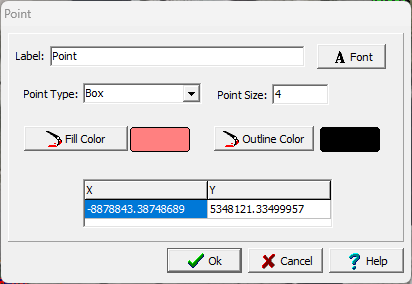
Points can be added to the map using either Edit > Points > Add or clicking on the Add option of the Points button menu. You will then need to click on the center of the point on the map. After this the Edit Point form below will be displayed.
(The appearance of the form will differ slightly depending on if it is WinLoG or WinLoG RT)
The following information can be specified on this form:
Label: This is an optional label for the point.
Font: This is used to change the font used for the labels. The same font is used for all annotation (rectangles, polygons, polylines, and points) labels.
Point Type: This is used to select the type of point (circle, box, cross, triangle up, triangle down, triangle left, or triangle right).
Point Size: This is the size of the point.
Fill Color: Click this button to adjust the color of the fill.
Outline Color: Click this button to adjust the color of the outline.
Position: This is the position of the point on the map.
Editing
Existing points can be edited using either Edit > Points > Edit or clicking on the Edit option of the Point button menu. After this the point to be edited should be clicked on, the Edit Point form above will then be displayed.
Deleting
Points can be deleted using either Edit > Points > Delete or clicking on the Delete option of the Point button menu. After this you will need to select the point to delete by clicking on it with the mouse.